基本使用
安装
pnpm install @reduxjs/toolkit react-redux
创建一个仓库
定义state
createSlice相当于创建了一个模块仓库,initialState存放状态,reducers存放改变状态的方法。
import { createSlice } from '@reduxjs/toolkit'

export const counterSlice = createSlice({
  name: 'counter',
  initialState: {
    value: 0
  },
  reducers: {
	...
  }
})

export const { ... } = counterSlice.actions

export default counterSlice.reducer
useSelector在组件中取出state数据
const count = useSelector(state => state.counter.value)
//useSelector等于如下-》
const selectCount = state => state.counter.value
const count = selectCount(store.getState())
在组件中使用数据
import React, { useState } from 'react'
import { useSelector, useDispatch } from 'react-redux'
import {
  decrement,
  increment,
  incrementByAmount,
  incrementAsync,
  selectCount
} from './counterSlice'
import styles from './Counter.module.css'

export function Counter() {
  const count = useSelector(state => state.counter.value)


  return (
    <div>
      <div className={styles.row}>
        <button
          className={styles.button}
          aria-label="Increment value"
          onClick={() => dispatch(increment())}
        >
          +
        </button>
        <span className={styles.value}>{count}</span>

        </button>
      </div>
      {/* 这里省略了额外的 render 代码 */}
    </div>
  )
}
定义reducer
Redux Toolkit 有一个名为 createSlice 的函数,它负责生成 action 类型字符串、action creator 函数和 action 对象的工作。我们要为这个 slice 定义一个名称,编写一个包含 reducer 函数的对象,它会自动生成相应的 action 代码。
import { createSlice } from '@reduxjs/toolkit'

export const counterSlice = createSlice({
  name: 'counter',
  initialState: {
    value: 0
  },
  reducers: {
    increment: state => {
      // Redux Toolkit 允许我们在 reducers 写 "可变" 逻辑。
      // 并不是真正的改变 state 因为它使用了 immer 库
      // 当 immer 检测到 "draft state" 改变时,会基于这些改变去创建一个新的
      // 不可变的 state
      state.value += 1
    },
    decrement: state => {
      state.value -= 1
    },
    incrementByAmount: (state, action) => {
      state.value += action.payload
    }
  }
})

export const { increment, decrement, incrementByAmount } = counterSlice.actions

export default counterSlice.reducer
createEntityAdapter 简化reducer操作
Redux Toolkit 包含 createEntityAdapter API,该 API 为具有归一化 state 的典型数据更新操作预先构建了 reducer。包括从 slice 中添加、更新和删除 items。createEntityAdapter 还会生成一些用于从 store 中读取值的记忆化 selectors。
import {
  createSlice,
  createSelector,
  createAsyncThunk,
  createEntityAdapter
} from '@reduxjs/toolkit'
import { client } from '../../api/client'
import { StatusFilters } from '../filters/filtersSlice'

const todosAdapter = createEntityAdapter()

const initialState = todosAdapter.getInitialState({
  status: 'idle'
})

// Thunk 函数
export const fetchTodos = createAsyncThunk('todos/fetchTodos', async () => {
  const response = await client.get('/fakeApi/todos')
  return response.todos
})

export const saveNewTodo = createAsyncThunk('todos/saveNewTodo', async text => {
  const initialTodo = { text }
  const response = await client.post('/fakeApi/todos', { todo: initialTodo })
  return response.todo
})

const todosSlice = createSlice({
  name: 'todos',
  initialState,
  reducers: {
    todoToggled(state, action) {
      const todoId = action.payload
      const todo = state.entities[todoId]
      todo.completed = !todo.completed
    },
    todoColorSelected: {
      reducer(state, action) {
        const { color, todoId } = action.payload
        state.entities[todoId].color = color
      },
      prepare(todoId, color) {
        return {
          payload: { todoId, color }
        }
      }
    },
    todoDeleted: todosAdapter.removeOne,
    allTodosCompleted(state, action) {
      Object.values(state.entities).forEach(todo => {
        todo.completed = true
      })
    },
    completedTodosCleared(state, action) {
      const completedIds = Object.values(state.entities)
        .filter(todo => todo.completed)
        .map(todo => todo.id)
      todosAdapter.removeMany(state, completedIds)
    }
  },
  extraReducers: builder => {
    builder
      .addCase(fetchTodos.pending, (state, action) => {
        state.status = 'loading'
      })
      .addCase(fetchTodos.fulfilled, (state, action) => {
        todosAdapter.setAll(state, action.payload)
        state.status = 'idle'
      })
      .addCase(saveNewTodo.fulfilled, todosAdapter.addOne)
  }
})

export const {
  allTodosCompleted,
  completedTodosCleared,
  todoAdded,
  todoColorSelected,
  todoDeleted,
  todoToggled
} = todosSlice.actions

export default todosSlice.reducer

export const { selectAll: selectTodos, selectById: selectTodoById } =
  todosAdapter.getSelectors(state => state.todos)

export const selectTodoIds = createSelector(
  // 首先,传递一个或多个 input selector 函数:
  selectTodos,
  // 然后,一个 output selector 接收所有输入结果作为参数
  // 并返回最终结果
  todos => todos.map(todo => todo.id)
)

export const selectFilteredTodos = createSelector(
  // 第一个 input selector:所有 todos
  selectTodos,
  // 第二个 input selector:所有 filter 值
  state => state.filters,
  // Output selector: 接收两个值
  (todos, filters) => {
    const { status, colors } = filters
    const showAllCompletions = status === StatusFilters.All
    if (showAllCompletions && colors.length === 0) {
      return todos
    }

    const completedStatus = status === StatusFilters.Completed
    // 根据 filter 条件返回未完成或已完成的 todos
    return todos.filter(todo => {
      const statusMatches =
        showAllCompletions || todo.completed === completedStatus
      const colorMatches = colors.length === 0 || colors.includes(todo.color)
      return statusMatches && colorMatches
    })
  }
)

export const selectFilteredTodoIds = createSelector(
  // 传入记忆化 selector
  selectFilteredTodos,
  // 并在 output selector 中导出数据
  filteredTodos => filteredTodos.map(todo => todo.id)
)
注册
Redux store 是使用 Redux Toolkit 中的 configureStore 函数创建的。configureStore 要求我们传入一个 reducer 参数。我们的应用程序可能由许多不同的特性组成,每个特性都可能有自己的 reducer 函数。当我们调用configureStore 时,我们可以传入一个对象中的所有不同的 reducer。
这里的注册类似于Vuex中的module。
import { configureStore } from '@reduxjs/toolkit'
import usersReducer from '../features/users/usersSlice'
import postsReducer from '../features/posts/postsSlice'
import commentsReducer from '../features/comments/commentsSlice'

export default configureStore({
  reducer: {
    users: usersReducer,
    posts: postsReducer,
    comments: commentsReducer
  }
})
在index.js中
import React from 'react'
import { render } from 'react-dom'
import { Provider } from 'react-redux'
import App from './components/App'
import store from './store/configureStore'


const renderApp = () =>
  render(
    <Provider store={store}>
      <App />
    </Provider>,
    document.getElementById('root')
  )

if (process.env.NODE_ENV !== 'production' && module.hot) {
  module.hot.accept('./components/App', renderApp)
}

renderApp()
configureStore 做了什么?
- 将 todosReducer 和 filtersReducer 组合到根 reducer 函数中,它将处理看起来像 {todos, filters} 的根 state
- 使用根 reducer 创建了 Redux store
- 自动添加了 “thunk” middleware
- 自动添加更多 middleware 来检查常见错误,例如意外改变(mutate)state
- 自动设置 Redux DevTools 扩展连接
configureStore相当于如下操作-》
import { combineReducers } from 'redux'

import todosReducer from './features/todos/todosSlice'
import filtersReducer from './features/filters/filtersSlice'

const rootReducer = combineReducers({
  // 定义一个名为 `todos` 的顶级 state 字段,值为 `todosReducer`
  todos: todosReducer,
  filters: filtersReducer
})

export default rootReducer
//index.js
import { createStore, applyMiddleware } from 'redux'
import thunkMiddleware from 'redux-thunk'
import { composeWithDevTools } from 'redux-devtools-extension'
import rootReducer from './reducer'

const composedEnhancer = composeWithDevTools(applyMiddleware(thunkMiddleware))

const store = createStore(rootReducer, composedEnhancer)
export default store
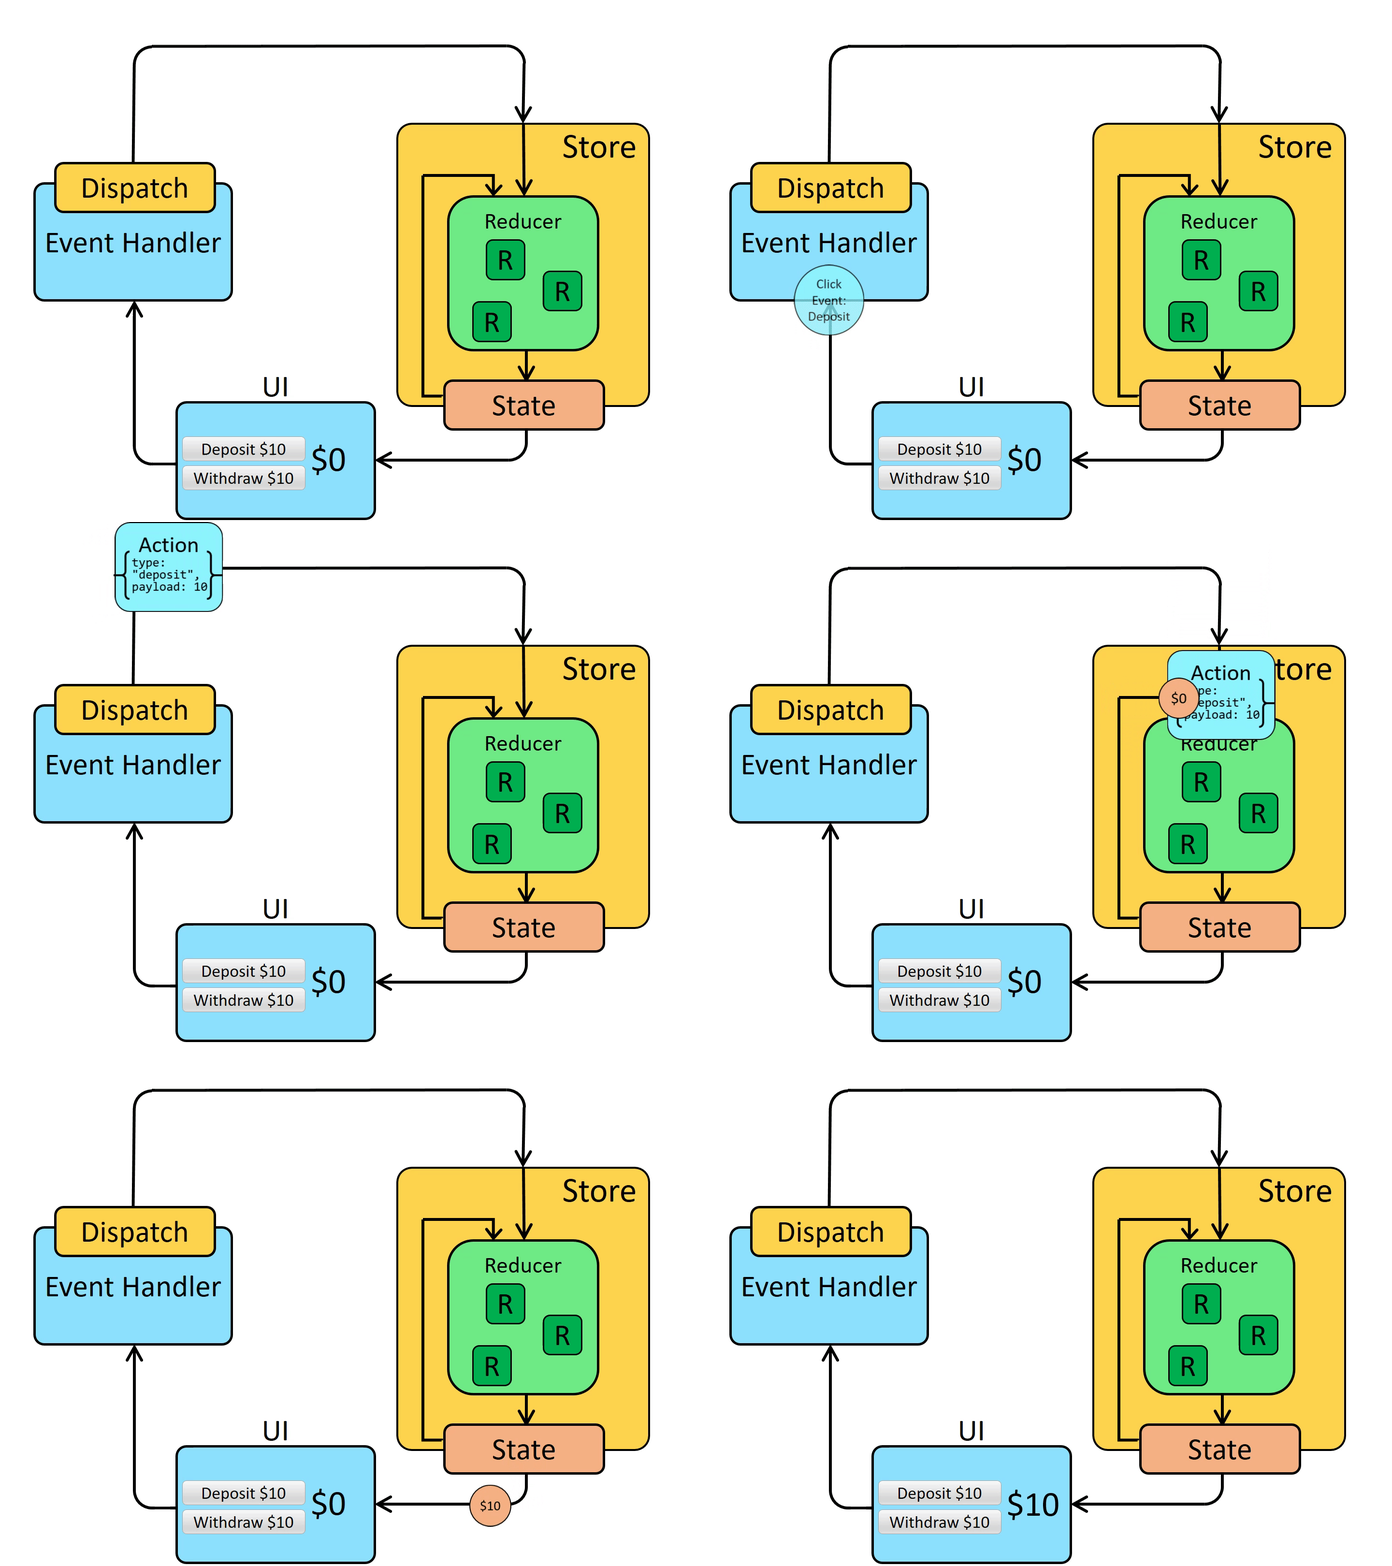
异步逻辑处理-Thunk
使用 thunk 需要在创建时将 redux-thunk middleware( Redux 的插件)添加到 Redux store 中。不过,Redux Toolkit 的 configureStore 函数已经自动为我们配置好了,所以我们可以继续在这里使用 thunk,然后使用createAsyncThunk创建Thunk,该函数接收两个参数:
- 一个字符串,用作生成的 action types 的前缀
- 一个 payload creator 回调函数,应该返回一个 Promise。这通常使用 async/await 语法编写,因为 async 函数会自动返回一个 Promise。
import { createSlice, createAsyncThunk } from '@reduxjs/toolkit'

// 省略 imports 和 state

export const fetchTodos = createAsyncThunk('todos/fetchTodos', async () => {
  const response = await client.get('/fakeApi/todos')
  return response.todos
})

const todosSlice = createSlice({
  name: 'todos',
  initialState,
  reducers: {
    // 省略 reducer cases
  },
  extraReducers: builder => {
    builder
      .addCase(fetchTodos.pending, (state, action) => {
        state.status = 'loading'
      })
      .addCase(fetchTodos.fulfilled, (state, action) => {
        const newEntities = {}
        action.payload.forEach(todo => {
          newEntities[todo.id] = todo
        })
        state.entities = newEntities
        state.status = 'idle'
      })
  }
})

// 省略 exports
createSlice 还接收一个叫 extraReducers 的选项,可以让同一个 slice reducer 监听其他 action types。这个字段应该是一个带有 builder 参数的回调函数,我们可以调用 builder.addCase(actionCreator, caseReducer) 来监听其他 actions。
所以,这里我们调用了 builder.addCase(fetchTodos.pending, (statea,action)=>{})。当该 action 被 dispatch 时,我们将运行设置 state.status = 'loading' 的 reducer。我们可以对 fetchTodos.fulfilled 做同样的事情,并处理我们从 API 接收到的数据。
总结Redux
Redux使用如下:
- 定义管理全局应用程序的 state
- 在应用程序中编写用于描述“发生了什么”的 action 对象
- 使用 reducer 函数,它会根据当前 state 和 action,创建并返回一个不可变的新 state
- 使用 useSelector 读取 React 组件中的 Redux state
- 使用 useDispatch 从 React 组件 dispatch actions
- 异步函数逻辑需要创建Thunk
