效果图:

组件完整代码如下:
<template>
<view class="base-style"
:style="'position: relative;width: ' + diameter + 'px;height: ' + diameter + 'px;display: flex;flex-direction: row;background-color: ' + bgColor + ';'">
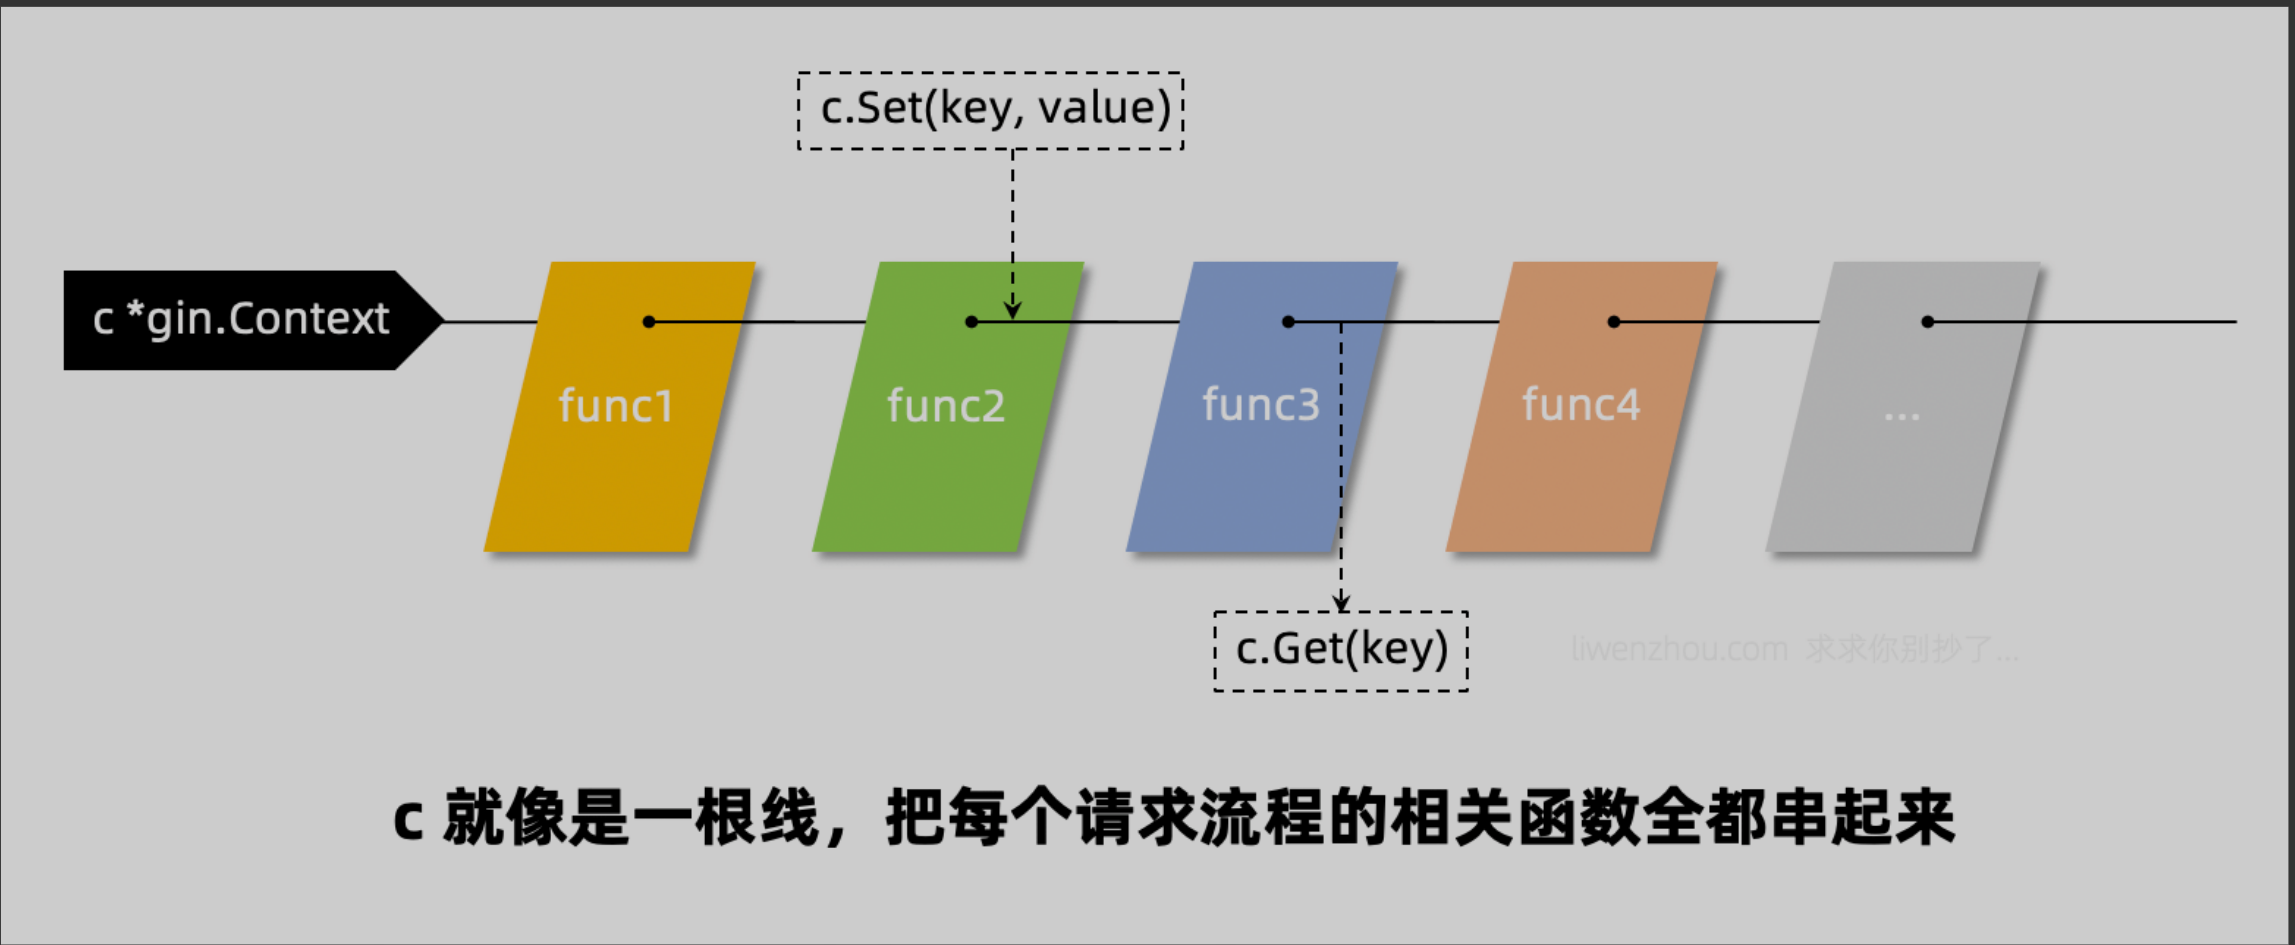
<!-- 左半圆和右半圆都要经历下面的5步:
[第1步]第1层限定区域;
[第2步]第2层决定显示一个整圆的左半边还是右半边;
[第3步]第3层先使用激活颜色绘制一个圆环, 再添加一个同级且宽度为区域一半的盒子A;
[第4步]在盒子A中再使用圆环底色绘制一个圆环, 此时整个圆环是 '左一半是激活颜色、右一半是圆环底色', 但这个圆环同时只能被看到一半;
[第5步]旋转第2层。 -->
<!-- 左半圆 -->
<view class="base-style" :style="firstLayerViewStyle">
<view :style="secondLayerViewStyle + secondLayerForLeft">
<!-- 使用激活颜色绘制一个圆环。 -->
<view :style="thirdLayerStyle">
</view>
<!-- 再使用背景色遮盖同级圆环的一半。 -->
<view class="base-style" :style="thirdLayerStyleForBg">
<view :style="fourthLayerStyleForBg" />
</view>
<view v-if="0 < ePercent && ePercent < 0.5" :style="endPointStyle + endPointStyleForLeft" />
</view>
</view>
<!-- 右半圆 -->
<view class="base-style" :style="firstLayerViewStyle">
<!-- 适配:为了避免右侧遮盖显示不全 此处向左多移动了1px -->
<view :style="secondLayerViewStyle + 'left: ' + (- diameter / 2 - 1) + 'px;' + secondLayerForRight">
<!-- 使用激活颜色绘制一个圆环。 -->
<view :style="thirdLayerStyle">
</view>
<!-- 再使用背景色遮盖同级圆环的一半。 -->
<view class="base-style" :style="thirdLayerStyleForBg">
<view :style="fourthLayerStyleForBg" />
</view>
<view v-if="ePercent > 0.5" :style="endPointStyle + endPointStyleForRight" />
</view>
</view>
<view v-if="0.5 == ePercent" :style="endPointStyle + 'background-color: ' + this.hoopBgColor + ';'" />
<!-- #ifdef APP-PLUS -->
<!-- 处理现象: 安卓App的顶部和底部会有一个小白点。 -->
<!-- <view v-if="ePercent > 0.5" :style="'position: absolute;top: 0;' + repairPointStyle" /> -->
<!-- <view v-if="1.0 == ePercent" :style="'position: absolute;bottom: 0;' + repairPointStyle" /> -->
<!-- #endif -->
</view>
</template>
<!-- 组件名称: 圆环进度条。
启发地址: https://www.cnblogs.com/jr1993/p/4677921.html 。
编者信息: 867003077@qq.com 。 -->
<script>
export default {
name: 'progressCircle',
props: {
// 背景色(不宜设置为透明 否则 需要 在 左thirdLayer 的外面 再嵌套一个盒子)。
bgColor: {
type: String,
default: '#FFFFFF'
},
// 圆环的外直径(单位px)。
diameter: {
type: Number,
default: 250
},
// 圆环线条的厚度(单位px)。
hoopThickness: {
type: Number,
default: 8
},
// 圆环底色(灰色的圆环)。
hoopBgColor: {
type: String,
// default: 'transparent'
default: '#F3F3F3'
},
// 圆环激活部分的颜色。
hoopColor: {
type: String,
default: '#FF4C20'
},
// 圆环进度百分比值(其值范围在0到1之间)。
percent: {
type: [Number, String],
default: 0,
validator: val => {
return val >= 0 && val <= 1;
},
},
animate: {
type: Boolean,
default: false,
},
},
data() {
return {
targetPercent: 0,
ePercent: 0,
showTimer: undefined,
};
},
watch: {
percent: {
handler: function() {
console.log('progressCircle_watch_percent', this.percent);
this.loadData();
},
},
},
computed: {
firstLayerViewStyle() {
return 'position: relative;width: ' + (this.diameter / 2) +
'px;height: ' + this.diameter + 'px;';
},
secondLayerViewStyle() {
return 'box-sizing: border-box;position: absolute;top: 0;width: ' + this.diameter +
'px;height: ' + this.diameter + 'px;';
},
thirdLayerStyle() {
return 'box-sizing: border-box;width: ' + this.diameter + 'px;height: ' + this.diameter +
'px;border-radius: ' + (this.diameter / 2) +
'px;border-width: ' + this.hoopThickness +
'px;border-style: solid;border-color: ' + this.hoopColor + ';';
},
thirdLayerStyleForBg() {
return 'box-sizing: border-box;position: absolute;top: 0;left: ' + (this.diameter / 2) + 'px;width: ' +
this.diameter + 'px;height: ' + this.diameter + 'px;background-color: ' + this.bgColor + ';';
},
fourthLayerStyleForBg() {
return 'box-sizing: border-box;margin-left: ' + (-this.diameter / 2) + 'px;width: ' + this.diameter +
'px;height: ' +
this.diameter + 'px;border-radius: ' + (this.diameter / 2) + 'px;border-width: ' +
this.hoopThickness + 'px;border-style: solid;border-color: ' + this.hoopBgColor + ';';
},
secondLayerForLeft() {
let angle = 0;
if (this.ePercent < 0.5) {
angle += (180 * (this.ePercent - 0.5) / 0.5);
}
// #ifdef APP-PLUS
return 'left: 0;transform: rotate(' + angle + 'deg);';
// #endif
// #ifdef MP-WEIXIN
return 'left: 0;transform: rotate(' + angle + 'deg);-webkit-transform: rotate(' + angle + 'deg);';
// #endif
},
secondLayerForRight() {
let angle = 0;
if (this.ePercent > 0.5) {
angle += (180 * (this.ePercent - 0.5) / 0.5);
}
// #ifdef APP-PLUS
return 'right: 0;transform: rotate(' + angle + 'deg);';
// #endif
// #ifdef MP-WEIXIN
return 'right: 0;transform: rotate(' + angle + 'deg);-webkit-transform: rotate(' + angle + 'deg);';
// #endif
},
// repairPointStyle() {
// return 'left: ' + (this.diameter - this.hoopThickness) / 2 + 'px;width: ' +
// this.hoopThickness + 'px;height: ' + this.hoopThickness + 'px;border-radius: ' +
// this.hoopThickness / 2 + 'px;background-color: ' + this.hoopColor + ';';
// },
endPointStyle() {
// 结束点圆心圈直径。
const _circleCenterRadius = 2;
return 'box-sizing: border-box;position: absolute;top: 0;left: ' + (this.diameter - this.hoopThickness) / 2 +
'px;width: ' +
this.hoopThickness + 'px;height: ' + this.hoopThickness + 'px;border-radius: ' + (this.hoopThickness / 2) +
'px;border-width: ' + (this.hoopThickness / 2 - _circleCenterRadius) +
'px;border-style: solid;border-color: ' +
this.hoopColor + ';';
},
endPointStyleForLeft() {
return 'background-color: ' + ((this.ePercent > 0.5) ? this.hoopColor : this.hoopBgColor) + ';';
},
endPointStyleForRight() {
return 'background-color: ' + ((1 == this.ePercent) ? this.hoopColor : this.hoopBgColor) + ';';
},
},
mounted() {
console.log('progressCircle_mounted');
this.loadData();
},
methods: {
loadData() {
this.targetPercent = parseFloat(this.percent);
console.log('progressCircle_loadData');
if (!this.animate) {
this.ePercent = this.targetPercent;
} else {
let _this = this;
this.ePercent = 0;
this.showTimer && clearInterval(this.showTimer);
this.showTimer = setInterval(() => {
let tempPercent = _this.ePercent + 0.1;
if (tempPercent < _this.targetPercent) {
_this.ePercent = tempPercent;
return;
};
_this.ePercent = _this.targetPercent;
clearInterval(_this.showTimer);
}, 200);
}
}
}
}
</script>
<style scoped>
.base-style {
box-sizing: border-box;
/* 溢出隐藏 */
overflow: hidden;
}
</style>调用页面:
<template>
  <view class="my-page-container" :style="{ 'height': pageBoxH + 'px' }" @click="currentPercent=0.8">
    <progress-circle class="mine-member-level-progress" :diameter="180" :hoopThickness="10" :hoopColor="'orange'"
      :percent="currentPercent" :animate="true" />
  </view>
</template>

<script>
  /** 演示页面 */
  import progressCircle from "@/components/progress-circle/index.vue";
  // import {
  //   queryDetail,
  // } from '@/api/mine.js';
  export default {
    name: 'myDemo',
    components: {
      progressCircle,
    },
    data() {
      return {
        pageBoxH: 1000,
        currentPercent: 0.25,
      };
    },
    beforeCreate() {
      console.log('beforeCreate enter');
    },
    created() {
      console.log('created enter');
    },
    mounted() {
      console.log('mounted enter');
    },
    onLoad(option) {
      console.log('onLoad enter');
    },
    onReady() {},
    methods: {},
  }
</script>

<style scoped>
  .my-page-container {
    background-color: white;
    box-sizing: border-box;
    padding: 10px 10px 50px 10px;
    display: flex;
    flex-direction: column;
  }
</style>