[oneAPI] 使用字符级 RNN 生成名称
- oneAPI特殊写法
- 使用字符级 RNN 生成名称
- Intel® Optimization for PyTorch
- 数据下载
- 加载数据并对数据进行处理
- 创建网络
- 训练过程
- 准备训练
- 训练网络
- 结果
- 参考资料
比赛:https://marketing.csdn.net/p/f3e44fbfe46c465f4d9d6c23e38e0517
Intel® DevCloud for oneAPI:https://devcloud.intel.com/oneapi/get_started/aiAnalyticsToolkitSamples/
oneAPI特殊写法
import intel_extension_for_pytorch as ipex

# Device configuration
device = torch.device('xpu' if torch.cuda.is_available() else 'cpu')

rnn = RNN(n_letters, 128, n_letters)
optim = torch.optim.SGD(rnn.parameters(), lr=0.01)

'''
Apply Intel Extension for PyTorch optimization against the model object and optimizer object.
'''
rnn, optim = ipex.optimize(rnn, optimizer=optim)

criterion = nn.NLLLoss()
使用字符级 RNN 生成名称
为了深入探索语言模型在分类和生成方面的卓越能力,我们特意设计了一个独特的任务。此任务的独特之处在于,它旨在综合学习多种语言的词义特征,以确保生成的内容与各种语言的词组相关性一致。
在任务的具体描述中,我们提供了一个多语言数据集,这个数据集包含多种语言的文本。通过这个数据集,我们的目标是使模型能够在生成名称时融合不同语言的特征。具体来说,我们会提供一个词的开头作为提示,然后模型将能够根据这个开头生成对应语言的名称,从而将不同语言的词意和语法特征进行完美融合。
通过这一任务,我们旨在实现一个在多语言环境中具有卓越生成和分类能力的语言模型。通过学习并融合不同语言的词义和语法特征,我们让使模型具备更广泛的应用潜力,能够在不同语境下生成准确、符合语法规则的名称。
> python sample.py Russian RUS
Rovakov
Uantov
Shavakov

> python sample.py German GER
Gerren
Ereng
Rosher

> python sample.py Spanish SPA
Salla
Parer
Allan

> python sample.py Chinese CHI
Chan
Hang
Iun
Intel® Optimization for PyTorch
在本次实验中,我们利用PyTorch和Intel® Optimization for PyTorch的强大功能,对PyTorch进行了精心的优化和扩展。这些优化举措极大地增强了PyTorch在各种任务中的性能,尤其是在英特尔硬件上的表现更加突出。通过这些优化策略,我们的模型在训练和推断过程中变得更加敏捷和高效,显著地减少了计算时间,提高了整体效能。我们通过深度融合硬件和软件的精巧设计,成功地释放了硬件潜力,使得模型的训练和应用变得更加快速和高效。这一系列优化举措为人工智能应用开辟了新的前景,带来了全新的可能性。

数据下载
从这里下载数据 并将其解压到当前目录。
加载数据并对数据进行处理
简而言之,有一堆data/names/[Language].txt每行都有一个名称的纯文本文件。我们将行分割成一个数组,将 Unicode 转换为 ASCII,最后得到一个字典。{language: [names …]}
from io import open
import glob
import os
import unicodedata
import string

all_letters = string.ascii_letters + " .,;'-"
n_letters = len(all_letters) + 1  # Plus EOS marker


def findFiles(path): return glob.glob(path)


# Turn a Unicode string to plain ASCII, thanks to https://stackoverflow.com/a/518232/2809427
def unicodeToAscii(s):
    return ''.join(
        c for c in unicodedata.normalize('NFD', s)
        if unicodedata.category(c) != 'Mn'
        and c in all_letters
    )


# Read a file and split into lines
def readLines(filename):
    with open(filename, encoding='utf-8') as some_file:
        return [unicodeToAscii(line.strip()) for line in some_file]


# Build the category_lines dictionary, a list of lines per category
category_lines = {}
all_categories = []
for filename in findFiles('data/names/*.txt'):
    category = os.path.splitext(os.path.basename(filename))[0]
    all_categories.append(category)
    lines = readLines(filename)
    category_lines[category] = lines

n_categories = len(all_categories)

if n_categories == 0:
    raise RuntimeError('Data not found. Make sure that you downloaded data '
                       'from https://download.pytorch.org/tutorial/data.zip and extract it to '
                       'the current directory.')

print('# categories:', n_categories, all_categories)
print(unicodeToAscii("O'Néàl"))
Output:
# categories: 18 ['Arabic', 'Chinese', 'Czech', 'Dutch', 'English', 'French', 'German', 'Greek', 'Irish', 'Italian', 'Japanese', 'Korean', 'Polish', 'Portuguese', 'Russian', 'Scottish', 'Spanish', 'Vietnamese']
O'Neal
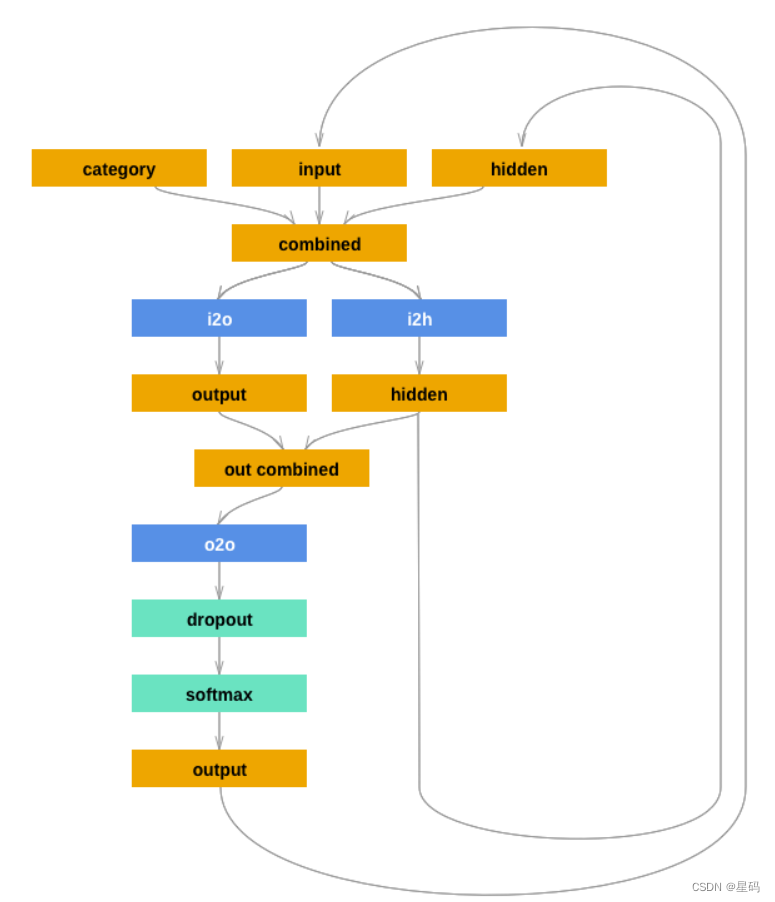
创建网络
序列到序列网络,或 seq2seq 网络,或编码器解码器网络,是由两个称为编码器和解码器的 RNN 组成的模型。编码器读取输入序列并输出单个向量,解码器读取该向量以产生输出序列。
我添加了第二个线性层o2o(在组合隐藏层和输出层之后)以赋予其更多的功能。还有一个 dropout 层,它以给定的概率(此处为 0.1)随机将部分输入归零,通常用于模糊输入以防止过度拟合。在这里,我们在网络末端使用它来故意添加一些混乱并增加采样多样性。
######################################################################
# Creating the Network
# ====================
import torch
import torch.nn as nn

import intel_extension_for_pytorch as ipex


class RNN(nn.Module):
    def __init__(self, input_size, hidden_size, output_size):
        super(RNN, self).__init__()
        self.hidden_size = hidden_size

        self.i2h = nn.Linear(n_categories + input_size + hidden_size, hidden_size)
        self.i2o = nn.Linear(n_categories + input_size + hidden_size, output_size)
        self.o2o = nn.Linear(hidden_size + output_size, output_size)
        self.dropout = nn.Dropout(0.1)
        self.softmax = nn.LogSoftmax(dim=1)

    def forward(self, category, input, hidden):
        input_combined = torch.cat((category, input, hidden), 1)
        hidden = self.i2h(input_combined)
        output = self.i2o(input_combined)
        output_combined = torch.cat((hidden, output), 1)
        output = self.o2o(output_combined)
        output = self.dropout(output)
        output = self.softmax(output)
        return output, hidden

    def initHidden(self):
        return torch.zeros(1, self.hidden_size)
训练过程
准备训练
import random

# Random item from a list
def randomChoice(l):
    return l[random.randint(0, len(l) - 1)]

# Get a random category and random line from that category
def randomTrainingPair():
    category = randomChoice(all_categories)
    line = randomChoice(category_lines[category])
    return category, line
# One-hot vector for category
def categoryTensor(category):
    li = all_categories.index(category)
    tensor = torch.zeros(1, n_categories)
    tensor[0][li] = 1
    return tensor

# One-hot matrix of first to last letters (not including EOS) for input
def inputTensor(line):
    tensor = torch.zeros(len(line), 1, n_letters)
    for li in range(len(line)):
        letter = line[li]
        tensor[li][0][all_letters.find(letter)] = 1
    return tensor

# ``LongTensor`` of second letter to end (EOS) for target
def targetTensor(line):
    letter_indexes = [all_letters.find(line[li]) for li in range(1, len(line))]
    letter_indexes.append(n_letters - 1) # EOS
    return torch.LongTensor(letter_indexes)
为了训练过程中的方便,我们将创建一个randomTrainingExample 函数来获取随机(类别、线)对并将它们转换为所需的(类别、输入、目标)张量。
# Make category, input, and target tensors from a random category, line pair
def randomTrainingExample():
    category, line = randomTrainingPair()
    category_tensor = categoryTensor(category)
    input_line_tensor = inputTensor(line)
    target_line_tensor = targetTensor(line)
    return category_tensor, input_line_tensor, target_line_tensor
训练网络
criterion = nn.NLLLoss()

learning_rate = 0.0005

def train(category_tensor, input_line_tensor, target_line_tensor):
    target_line_tensor.unsqueeze_(-1)
    hidden = rnn.initHidden()

    rnn.zero_grad()

    loss = torch.Tensor([0]) # you can also just simply use ``loss = 0``

    for i in range(input_line_tensor.size(0)):
        output, hidden = rnn(category_tensor, input_line_tensor[i], hidden)
        l = criterion(output, target_line_tensor[i])
        loss += l

    loss.backward()

    for p in rnn.parameters():
        p.data.add_(p.grad.data, alpha=-learning_rate)

    return output, loss.item() / input_line_tensor.size(0)
为了跟踪训练需要多长时间,我添加了一个 timeSince(timestamp)返回人类可读字符串的函数:
import time
import math

def timeSince(since):
    now = time.time()
    s = now - since
    m = math.floor(s / 60)
    s -= m * 60
    return '%dm %ds' % (m, s)
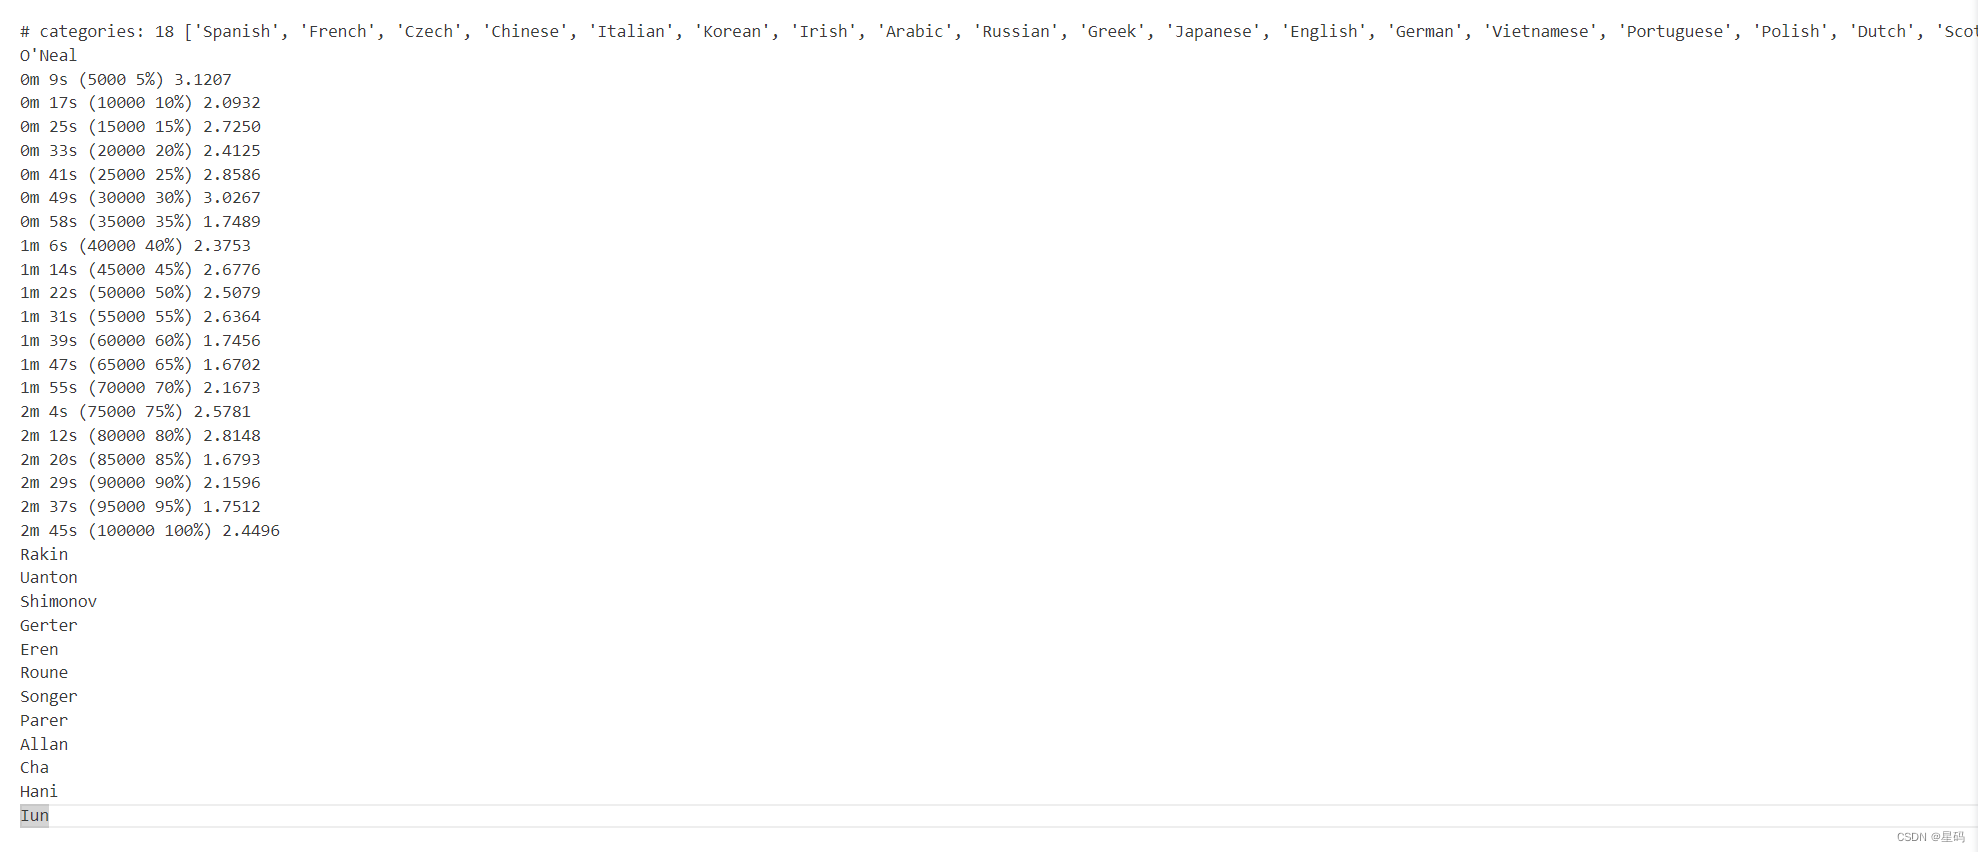
训练就像平常一样 - 多次调用训练并等待几分钟,打印当前时间和每个print_every 示例的损失,并存储每个plot_every示例的平均损失all_losses以供稍后绘制。
rnn = RNN(n_letters, 128, n_letters)

n_iters = 100000
print_every = 5000
plot_every = 500
all_losses = []
total_loss = 0 # Reset every ``plot_every`` ``iters``

start = time.time()

for iter in range(1, n_iters + 1):
    output, loss = train(*randomTrainingExample())
    total_loss += loss

    if iter % print_every == 0:
        print('%s (%d %d%%) %.4f' % (timeSince(start), iter, iter / n_iters * 100, loss))

    if iter % plot_every == 0:
        all_losses.append(total_loss / plot_every)
        total_loss = 0
结果
参考资料
https://pytorch.org/tutorials/intermediate/seq2seq_translation_tutorial.html#