一、模型转换
1.onnxruntime
ONNX Runtime(ONNX Runtime或ORT)是一个开源的高性能推理引擎,用于部署和运行机器学习模型。它的设计目标是优化执行使用Open Neural Network Exchange(ONNX)格式定义的模型,ONNX是一种用于表示机器学习模型的开放标准。
ONNX Runtime提供了几个关键功能和优势:
跨平台兼容性:ONNX Runtime旨在与各种硬件和操作系统平台兼容,包括Windows、Linux以及各种加速器,如CPU、GPU和FPGA。这使得在不同环境中轻松部署和运行模型成为可能。
高性能:ONNX Runtime经过性能优化,能够提供低延迟的模型执行。它针对不同的硬件平台进行了优化,以确保模型高效运行。
多框架支持:ONNX Runtime可以与使用不同的机器学习框架创建的模型一起使用,包括PyTorch、TensorFlow等,这要归功于其对ONNX格式的支持。
模型转换:ONNX Runtime可以将来自支持的框架的模型转换为ONNX格式,从而更容易在各种部署场景中使用这些模型。
多语言支持:ONNX Runtime可用于多种编程语言,包括C++、C#、Python等,使其可以被广泛的开发人员使用。
自定义运算符:它支持自定义运算符,允许开发人员扩展其功能以支持特定操作或硬件加速。
ONNX Runtime广泛用于各种机器学习应用的生产部署,包括计算机视觉、自然语言处理等。它由ONNX社区积极维护,并持续接受更新和改进。
- pt模型与onnx模型
.pt 模型和 .onnx 模型是两种不同的模型文件格式,用于表示深度学习模型。它们之间的主要区别包括:
文件格式:
.pt 模型:这是PyTorch框架的权重文件格式,通常以.pt或.pth扩展名保存。它包含了模型的权重参数和模型结构的定义。这个文件格式是PyTorch特定的。
.onnx 模型:这是ONNX(Open Neural Network Exchange)格式的模型文件,通常以.onnx扩展名保存。ONNX是一种中间表示格式,独立于任何特定的深度学习框架,用于跨不同框架之间的模型转换和部署。
框架依赖:
.pt 模型:它依赖于PyTorch框架,因此在加载和运行时需要使用PyTorch库。这限制了它在不同框架上的直接使用。
.onnx 模型:ONNX 模型是独立于深度学习框架的,可以在支持ONNX的不同框架中加载和运行,例如ONNX Runtime、TensorFlow、Caffe2等。
跨平台兼容性:
.pt 模型:它通常需要在不同平台上进行PyTorch的兼容性配置,可能需要额外的工作和依赖处理。
.onnx 模型:由于ONNX的独立性,更容易在不同平台和硬件上进行部署,无需担心框架依赖性问题。
3.Yolov8 .pt模型转换onnx
如果想跨平台兼容性,.pt 模型要在不同框架中使用或进行跨平台部署,要使用代码或库将其转换为 ONNX 格式。ONNX转换工具可以将PyTorch模型转换为ONNX格式。
from ultralytics import YOLO

# load model
model = YOLO('yolov8m.pt')

# Export model
success = model.export(format="onnx")
二、模型推理
1.环境部署
onnx模型模型推理只要依赖onnxruntime库,图像处理要依赖opencv,所以只要安装这两个库就行,不用安装过多的依赖。
pip install onnxruntime
pip install opencv-python
pip install numpy
pip install gradio
2.部署代码
utils.py
import numpy as np
import cv2

class_names = ['person', 'bicycle', 'car', 'motorcycle', 'airplane', 'bus', 'train', 'truck', 'boat', 'traffic light',
               'fire hydrant', 'stop sign', 'parking meter', 'bench', 'bird', 'cat', 'dog', 'horse', 'sheep', 'cow',
               'elephant', 'bear', 'zebra', 'giraffe', 'backpack', 'umbrella', 'handbag', 'tie', 'suitcase', 'frisbee',
               'skis', 'snowboard', 'sports ball', 'kite', 'baseball bat', 'baseball glove', 'skateboard', 'surfboard',
               'tennis racket', 'bottle', 'wine glass', 'cup', 'fork', 'knife', 'spoon', 'bowl', 'banana', 'apple',
               'sandwich', 'orange', 'broccoli', 'carrot', 'hot dog', 'pizza', 'donut', 'cake', 'chair', 'couch',
               'potted plant', 'bed', 'dining table', 'toilet', 'tv', 'laptop', 'mouse', 'remote', 'keyboard',
               'cell phone', 'microwave', 'oven', 'toaster', 'sink', 'refrigerator', 'book', 'clock', 'vase',
               'scissors', 'teddy bear', 'hair drier', 'toothbrush']


# Create a list of colors for each class where each color is a tuple of 3 integer values
rng = np.random.default_rng(3)
colors = rng.uniform(0, 255, size=(len(class_names), 3))


def nms(boxes, scores, iou_threshold):
    # Sort by score
    sorted_indices = np.argsort(scores)[::-1]

    keep_boxes = []
    while sorted_indices.size > 0:
        # Pick the last box
        box_id = sorted_indices[0]
        keep_boxes.append(box_id)

        # Compute IoU of the picked box with the rest
        ious = compute_iou(boxes[box_id, :], boxes[sorted_indices[1:], :])

        # Remove boxes with IoU over the threshold
        keep_indices = np.where(ious < iou_threshold)[0]

        # print(keep_indices.shape, sorted_indices.shape)
        sorted_indices = sorted_indices[keep_indices + 1]

    return keep_boxes

def multiclass_nms(boxes, scores, class_ids, iou_threshold):

    unique_class_ids = np.unique(class_ids)

    keep_boxes = []
    for class_id in unique_class_ids:
        class_indices = np.where(class_ids == class_id)[0]
        class_boxes = boxes[class_indices,:]
        class_scores = scores[class_indices]

        class_keep_boxes = nms(class_boxes, class_scores, iou_threshold)
        keep_boxes.extend(class_indices[class_keep_boxes])

    return keep_boxes

def compute_iou(box, boxes):
    # Compute xmin, ymin, xmax, ymax for both boxes
    xmin = np.maximum(box[0], boxes[:, 0])
    ymin = np.maximum(box[1], boxes[:, 1])
    xmax = np.minimum(box[2], boxes[:, 2])
    ymax = np.minimum(box[3], boxes[:, 3])

    # Compute intersection area
    intersection_area = np.maximum(0, xmax - xmin) * np.maximum(0, ymax - ymin)

    # Compute union area
    box_area = (box[2] - box[0]) * (box[3] - box[1])
    boxes_area = (boxes[:, 2] - boxes[:, 0]) * (boxes[:, 3] - boxes[:, 1])
    union_area = box_area + boxes_area - intersection_area

    # Compute IoU
    iou = intersection_area / union_area

    return iou


def xywh2xyxy(x):
    # Convert bounding box (x, y, w, h) to bounding box (x1, y1, x2, y2)
    y = np.copy(x)
    y[..., 0] = x[..., 0] - x[..., 2] / 2
    y[..., 1] = x[..., 1] - x[..., 3] / 2
    y[..., 2] = x[..., 0] + x[..., 2] / 2
    y[..., 3] = x[..., 1] + x[..., 3] / 2
    return y


def draw_detections(image, boxes, scores, class_ids, mask_alpha=0.3):
    det_img = image.copy()

    img_height, img_width = image.shape[:2]
    font_size = min([img_height, img_width]) * 0.0006
    text_thickness = int(min([img_height, img_width]) * 0.001)

    det_img = draw_masks(det_img, boxes, class_ids, mask_alpha)

    # Draw bounding boxes and labels of detections
    for class_id, box, score in zip(class_ids, boxes, scores):
        color = colors[class_id]

        draw_box(det_img, box, color)

        label = class_names[class_id]
        caption = f'{label} {int(score * 100)}%'
        draw_text(det_img, caption, box, color, font_size, text_thickness)

    return det_img

def detections_dog(image, boxes, scores, class_ids, mask_alpha=0.3):
    det_img = image.copy()

    img_height, img_width = image.shape[:2]
    font_size = min([img_height, img_width]) * 0.0006
    text_thickness = int(min([img_height, img_width]) * 0.001)

    # det_img = draw_masks(det_img, boxes, class_ids, mask_alpha)

    # Draw bounding boxes and labels of detections

    for class_id, box, score in zip(class_ids, boxes, scores):

        color = colors[class_id]

        draw_box(det_img, box, color)
        label = class_names[class_id]
        caption = f'{label} {int(score * 100)}%'
        draw_text(det_img, caption, box, color, font_size, text_thickness)

    return det_img

def draw_box( image: np.ndarray, box: np.ndarray, color: tuple[int, int, int] = (0, 0, 255),
             thickness: int = 2) -> np.ndarray:
    x1, y1, x2, y2 = box.astype(int)
    return cv2.rectangle(image, (x1, y1), (x2, y2), color, thickness)


def draw_text(image: np.ndarray, text: str, box: np.ndarray, color: tuple[int, int, int] = (0, 0, 255),
              font_size: float = 0.001, text_thickness: int = 2) -> np.ndarray:
    x1, y1, x2, y2 = box.astype(int)
    (tw, th), _ = cv2.getTextSize(text=text, fontFace=cv2.FONT_HERSHEY_SIMPLEX,
                                  fontScale=font_size, thickness=text_thickness)
    th = int(th * 1.2)

    cv2.rectangle(image, (x1, y1),
                  (x1 + tw, y1 - th), color, -1)

    return cv2.putText(image, text, (x1, y1), cv2.FONT_HERSHEY_SIMPLEX, font_size, (255, 255, 255), text_thickness, cv2.LINE_AA)

def draw_masks(image: np.ndarray, boxes: np.ndarray, classes: np.ndarray, mask_alpha: float = 0.3) -> np.ndarray:
    mask_img = image.copy()

    # Draw bounding boxes and labels of detections
    for box, class_id in zip(boxes, classes):
        color = colors[class_id]

        x1, y1, x2, y2 = box.astype(int)

        # Draw fill rectangle in mask image
        cv2.rectangle(mask_img, (x1, y1), (x2, y2), color, -1)

    return cv2.addWeighted(mask_img, mask_alpha, image, 1 - mask_alpha, 0)
YOLODet.py
import time
import cv2
import numpy as np
import onnxruntime

from detection.utils import xywh2xyxy, draw_detections, multiclass_nms,detections_dog

class YOLODet:

    def __init__(self, path, conf_thres=0.7, iou_thres=0.5):
        self.conf_threshold = conf_thres
        self.iou_threshold = iou_thres

        # Initialize model
        self.initialize_model(path)

    def __call__(self, image):
        return self.detect_objects(image)

    def initialize_model(self, path):
        self.session = onnxruntime.InferenceSession(path,providers=onnxruntime.get_available_providers())
        # Get model info
        self.get_input_details()
        self.get_output_details()


    def detect_objects(self, image):
        input_tensor = self.prepare_input(image)

        # Perform inference on the image
        outputs = self.inference(input_tensor)

        self.boxes, self.scores, self.class_ids = self.process_output(outputs)

        return self.boxes, self.scores, self.class_ids

    def prepare_input(self, image):
        self.img_height, self.img_width = image.shape[:2]

        input_img = cv2.cvtColor(image, cv2.COLOR_BGR2RGB)

        # Resize input image
        input_img = cv2.resize(input_img, (self.input_width, self.input_height))

        # Scale input pixel values to 0 to 1
        input_img = input_img / 255.0
        input_img = input_img.transpose(2, 0, 1)
        input_tensor = input_img[np.newaxis, :, :, :].astype(np.float32)

        return input_tensor


    def inference(self, input_tensor):
        start = time.perf_counter()
        outputs = self.session.run(self.output_names, {self.input_names[0]: input_tensor})

        # print(f"Inference time: {(time.perf_counter() - start)*1000:.2f} ms")
        return outputs

    def process_output(self, output):
        predictions = np.squeeze(output[0]).T

        # Filter out object confidence scores below threshold
        scores = np.max(predictions[:, 4:], axis=1)
        predictions = predictions[scores > self.conf_threshold, :]
        scores = scores[scores > self.conf_threshold]

        if len(scores) == 0:
            return [], [], []

        # Get the class with the highest confidence
        class_ids = np.argmax(predictions[:, 4:], axis=1)

        # Get bounding boxes for each object
        boxes = self.extract_boxes(predictions)

        # Apply non-maxima suppression to suppress weak, overlapping bounding boxes
        # indices = nms(boxes, scores, self.iou_threshold)
        indices = multiclass_nms(boxes, scores, class_ids, self.iou_threshold)

        return boxes[indices], scores[indices], class_ids[indices]

    def extract_boxes(self, predictions):
        # Extract boxes from predictions
        boxes = predictions[:, :4]

        # Scale boxes to original image dimensions
        boxes = self.rescale_boxes(boxes)

        # Convert boxes to xyxy format
        boxes = xywh2xyxy(boxes)

        return boxes

    def rescale_boxes(self, boxes):

        # Rescale boxes to original image dimensions
        input_shape = np.array([self.input_width, self.input_height, self.input_width, self.input_height])
        boxes = np.divide(boxes, input_shape, dtype=np.float32)
        boxes *= np.array([self.img_width, self.img_height, self.img_width, self.img_height])
        return boxes

    def draw_detections(self, image, draw_scores=True, mask_alpha=0.4):

        return detections_dog(image, self.boxes, self.scores,
                               self.class_ids, mask_alpha)

    def get_input_details(self):
        model_inputs = self.session.get_inputs()
        self.input_names = [model_inputs[i].name for i in range(len(model_inputs))]

        self.input_shape = model_inputs[0].shape
        self.input_height = self.input_shape[2]
        self.input_width = self.input_shape[3]

    def get_output_details(self):
        model_outputs = self.session.get_outputs()
        self.output_names = [model_outputs[i].name for i in range(len(model_outputs))]
- 模型测试
图像推理:
import cv2
import numpy as np
from detection import YOLODet
import gradio as gr

model = 'yolov8m.onnx'
yolo_det = YOLODet(model, conf_thres=0.5, iou_thres=0.3)

def det_img(cv_src):
    yolo_det(cv_src)
    cv_dst = yolo_det.draw_detections(cv_src)

    return cv_dst

if __name__ == '__main__':

     input = gr.Image()
     output = gr.Image()

     demo = gr.Interface(fn=det_img, inputs=input, outputs=output)
     demo.launch()
视频推理:
def detectio_video(input_path,model_path,output_path):

    cap = cv2.VideoCapture(input_path)

    fps = int(cap.get(5))

    t = int(1000 / fps)

    videoWriter = None

    det = YOLODet(model_path, conf_thres=0.3, iou_thres=0.5)

    while True:

        # try:
        _, img = cap.read()
        if img is None:
            break

        det(img)

        cv_dst = det.draw_detections(img)

        if videoWriter is None:
            fourcc = cv2.VideoWriter_fourcc('m', 'p', '4', 'v')
            videoWriter = cv2.VideoWriter(output_path, fourcc, fps, (cv_dst.shape[1], cv_dst.shape[0]))
            videoWriter.write(cv_dst)

        cv2.imshow("detection", cv_dst)
        cv2.waitKey(t)

        if cv2.getWindowProperty("detection", cv2.WND_PROP_AUTOSIZE) < 1:
            # 点x退出
            break

    cap.release()
    videoWriter.release()
    cv2.destroyAllWindows()
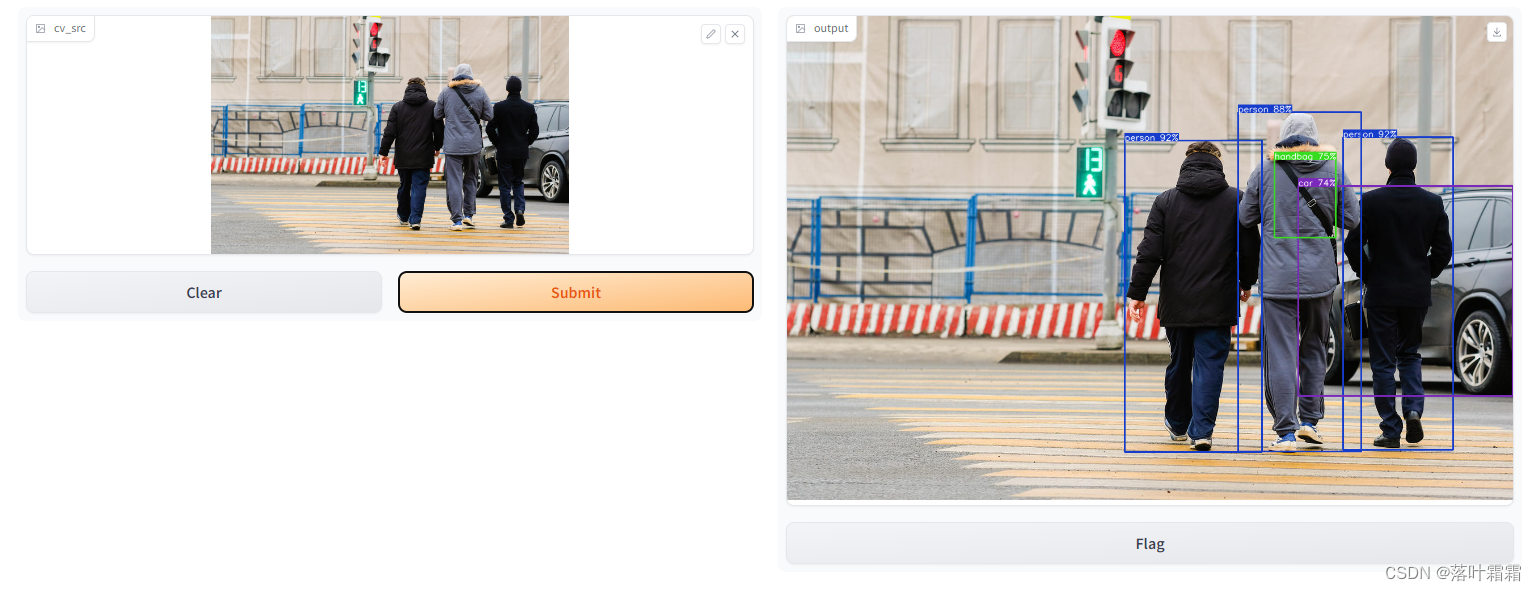
测试结果:
目标检测


![[Verilog] 加法器实现](https://img-blog.csdnimg.cn/direct/5a6e645cba2e49e8a0cdcf1883984cb1.png)