环境信息
使用 python mmdet3d/utils/collect_env.py收集环境信息
sys.platform: linux
Python: 3.7.12 | packaged by conda-forge | (default, Oct 26 2021, 06:08:21) [GCC 9.4.0]
CUDA available: True
numpy_random_seed: 2147483648
GPU 0,1: NVIDIA GeForce RTX 3090
CUDA_HOME: /usr/local/cuda
NVCC: Cuda compilation tools, release 11.3, V11.3.109
GCC: gcc (Ubuntu 7.5.0-6ubuntu2) 7.5.0
PyTorch: 1.8.1+cu111
PyTorch compiling details: PyTorch built with:
  - GCC 7.3
  - C++ Version: 201402
  - Intel(R) Math Kernel Library Version 2020.0.0 Product Build 20191122 for Intel(R) 64 architecture applications
  - Intel(R) MKL-DNN v1.7.0 (Git Hash 7aed236906b1f7a05c0917e5257a1af05e9ff683)
  - OpenMP 201511 (a.k.a. OpenMP 4.5)
  - NNPACK is enabled
  - CPU capability usage: AVX2
  - CUDA Runtime 11.1
  - NVCC architecture flags: -gencode;arch=compute_37,code=sm_37;-gencode;arch=compute_50,code=sm_50;-gencode;arch=compute_60,code=sm_60;-gencode;arch=compute_70,code=sm_70;-gencode;arch=compute_75,code=sm_75;-gencode;arch=compute_80,code=sm_80;-gencode;arch=compute_86,code=sm_86
  - CuDNN 8.0.5
  - Magma 2.5.2
  - Build settings: BLAS_INFO=mkl, BUILD_TYPE=Release, CUDA_VERSION=11.1, CUDNN_VERSION=8.0.5, CXX_COMPILER=/opt/rh/devtoolset-7/root/usr/bin/c++, CXX_FLAGS= -Wno-deprecated -fvisibility-inlines-hidden -DUSE_PTHREADPOOL -fopenmp -DNDEBUG -DUSE_KINETO -DUSE_FBGEMM -DUSE_QNNPACK -DUSE_PYTORCH_QNNPACK -DUSE_XNNPACK -O2 -fPIC -Wno-narrowing -Wall -Wextra -Werror=return-type -Wno-missing-field-initializers -Wno-type-limits -Wno-array-bounds -Wno-unknown-pragmas -Wno-sign-compare -Wno-unused-parameter -Wno-unused-variable -Wno-unused-function -Wno-unused-result -Wno-unused-local-typedefs -Wno-strict-overflow -Wno-strict-aliasing -Wno-error=deprecated-declarations -Wno-stringop-overflow -Wno-psabi -Wno-error=pedantic -Wno-error=redundant-decls -Wno-error=old-style-cast -fdiagnostics-color=always -faligned-new -Wno-unused-but-set-variable -Wno-maybe-uninitialized -fno-math-errno -fno-trapping-math -Werror=format -Wno-stringop-overflow, LAPACK_INFO=mkl, PERF_WITH_AVX=1, PERF_WITH_AVX2=1, PERF_WITH_AVX512=1, TORCH_VERSION=1.8.1, USE_CUDA=ON, USE_CUDNN=ON, USE_EXCEPTION_PTR=1, USE_GFLAGS=OFF, USE_GLOG=OFF, USE_MKL=ON, USE_MKLDNN=ON, USE_MPI=OFF, USE_NCCL=ON, USE_NNPACK=ON, USE_OPENMP=ON,

TorchVision: 0.9.1+cu111
OpenCV: 4.6.0
MMEngine: 0.9.1
MMDetection: 3.2.0
MMDetection3D: 1.3.0+9d3e162
spconv2.0: True
以前写过mmdetection3d中的可视化,但mmdetection3d更新后代码已经不适用了,正好我把我的工作全转移到新版mmdetection3d上来了,因此重新写了一下推理结果可视化。整体思路还是构建模型、构建数据、推理、绘制,下面分步讲解
1、构建模型
我用jupyter实现,首先需要确保jupyter的工作路径在mmdetection3d的工作路径下,不然会存在找不到mmdet3d的问题
import sys
import os
import torch
import cv2
import numpy as np

# 添加工作路径,不然找不到mmdet3d
os.chdir('/home/wistful/work/open_mmlab_mmdetection3d')
sys.path.append('/home/wistful/work/open_mmlab_mmdetection3d')


# load config
config_file = 'configs/point_cls_voxel/pointpillars_hv_secfpn_8x2-160e_kitti-3d-3class.py'
checkpoint_file = '/home/wistful/work/open_mmlab_mmdetection3d/work_dirs/pointpillars_hv_secfpn_8x2-160e_kitti-3d-3class/epoch_80.pth'

# 构建模型
from mmdet3d.apis import init_model, inference_detector
device = 'cuda:0'
model = init_model(config_file, checkpoint=checkpoint_file, device=device)
至此模型已经构建,下一步是构建数据,送入模型以获取推理结果
2、构建数据
新版mmdet3d的模型输入分为两个部分batch_inputs_dict, batch_data_samples。batch_inputs_dict包含了模型推理所需的数据(点云、图像),batch_data_samples包含了训练时需要的bbox等信息。因此,需要构建batch_inputs_dict,我写了一个简单的函数,可以调用
build_dataloader.py文件:
from mmdet3d.registry import DATASETS
from tools.misc.browse_dataset import build_data_cfg
from mmengine.registry import init_default_scope


def load_datasets(config_file, aug=False, set='train'):
    """
    Args:
        config_file: 配置文件路径
        aug:是否数据增强(待测试)
        set:要读取的数据集,'train','test','val'

    Returns:
    """
    cfg = build_data_cfg(config_file, aug=aug, cfg_options=None)
    init_default_scope(cfg.get('default_scope', 'mmdet3d'))
    # 选择需要读取的数据集
    if set == 'train':
        dataloader = cfg.train_dataloader.dataset
    elif set == 'val':
        dataloader = cfg.val_dataloader.dataset
    elif set == 'test':
        dataloader = cfg.test_dataloader.dataset

    return DATASETS.build(dataloader)


def build_batch_dict(datasets, batch_size, device, images=False):
    """
    Args:
        device: 指定设备

        datasets: 传入数据集
        batch_size: 批次大小
        images: 加入图像

    Returns:

    """
    # TODO: 编写加入图像的代码
    points = []
    images = []
    batch_data_samples = []
    for i in range(batch_size):
        # 确保在同一个device上
        points.append(datasets[i]['inputs']['points'].to(device))

        data_samples = datasets[i]['data_samples']
        # if data_samples.gt_instances_3d
        if len(data_samples.gt_instances_3d.keys()) != 0:
            data_samples.gt_instances_3d.bboxes_3d = data_samples.gt_instances_3d.bboxes_3d.to(device)
            data_samples.gt_instances_3d.labels_3d = data_samples.gt_instances_3d.labels_3d.to(device)
    batch_inputs_dict = dict()
    batch_inputs_dict['points'] = points

    # batch_data_samples = data_samples
    return batch_inputs_dict, batch_data_samples


def cyclic_load_data_item(datasets, index, device, images=False):
    """
    Args:
        device: 指定设备
        datasets: 传入数据集
        index: 索引
        images: 加入图像

    Returns:
        单条数据,适用于循环遍历整个数据集
    """
    # TODO: 编写加入图像的代码
    points = []
    images = []
    points.append(datasets[index]['inputs']['points'].to(device))

    batch_inputs_dict = dict()
    batch_inputs_dict['points'] = points

    data_samples = datasets[index]['data_samples']
    if len(data_samples.gt_instances_3d.keys()) !=0:
        data_samples.gt_instances_3d.bboxes_3d = data_samples.gt_instances_3d.bboxes_3d.to(device)
        data_samples.gt_instances_3d.labels_3d = data_samples.gt_instances_3d.labels_3d.to(device)
    batch_data_samples = [data_samples]
    return batch_inputs_dict, batch_data_samples
下面利用这个函数,实现构建数据集
# 构建数据集
from custom_API.build_dataloader import load_datasets # 我放在了custom_API路径下,如何导入取决于读者如何存放

set = 'test'

# set字段表示构建的数据集
datasets = load_datasets(dataset_config, aug=False, set=set) # aug字段表示不使用数据增强
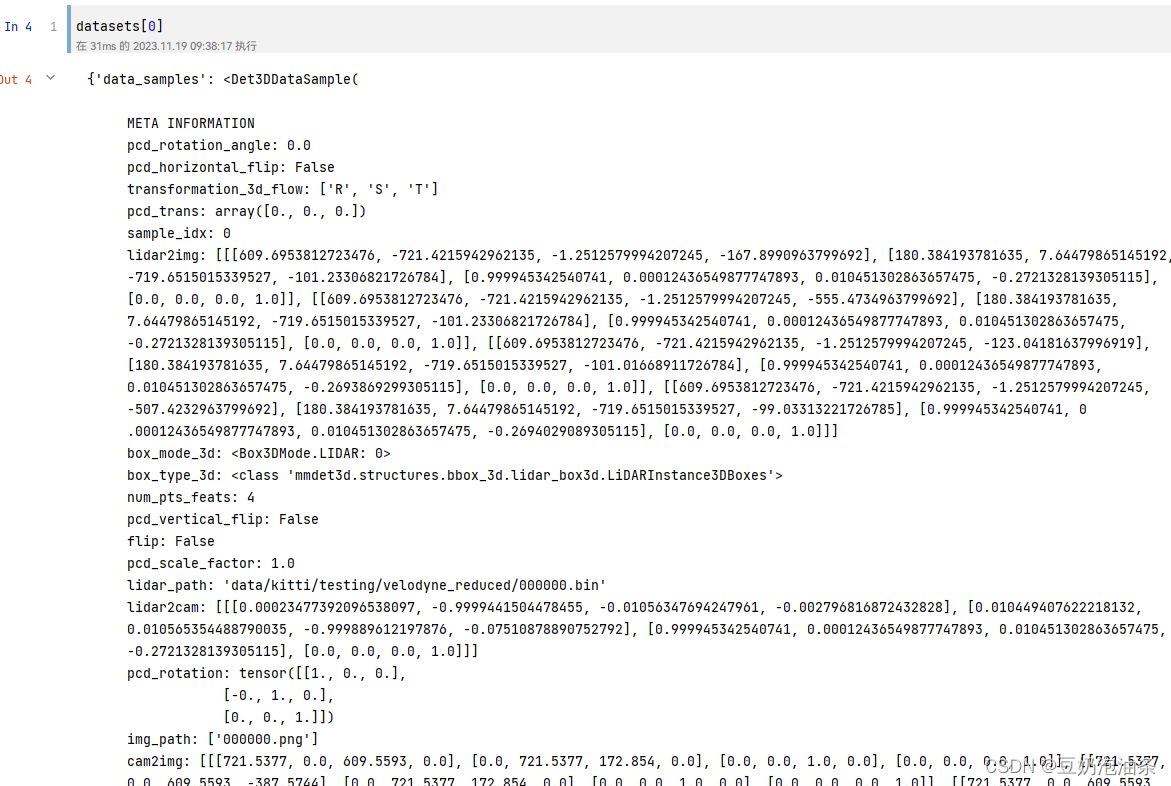
至此,datasets为一个列表,长度就是数据集的总样本数。eg:datasets[0]里面就包含了第1个样本的全部信息,下面可以看一下输出
3、推理与绘制
我们已经得到了整个数据集,那么我们就可以使用数据集中的任意一条数据进行推理,根据这个思路,我们也能很方便的推理完整个数据集。绘制部分的代码我使用的是旧版mmdetection3d中的代码,下面是代码:
# draw_box.py
import os
from custom_API.draw_utils import draw_lidar_bbox3d_on_img, draw_depth_bbox3d_on_img, draw_camera_bbox3d_on_img
import mmcv
from os import path as osp
import numpy as np
def show_multi_modality_result(img,
gt_bboxes,
pred_bboxes,
batch_data_samples,
out_dir,
filename,
type='train',
box_mode='lidar',
img_metas=None,
show=False,
gt_bbox_color=(61, 102, 255),
pred_bbox_color=(241, 101, 72)):
"""Convert multi-modality detection results into 2D results.
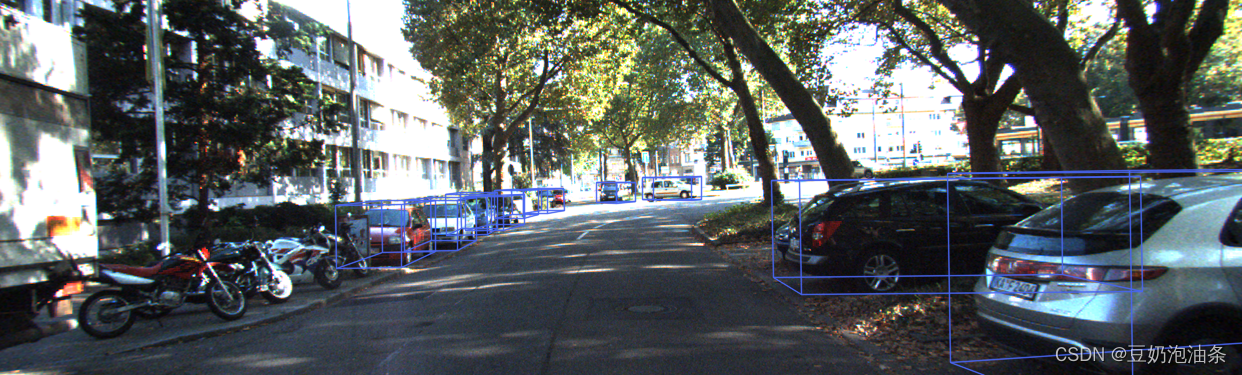
将3D边框投影到2D图像平面并且可视化
Project the predicted 3D bbox to 2D image plane and visualize them.
Args:
img (np.ndarray): The numpy array of image in cv2 fashion.
gt_bboxes (:obj:`BaseInstance3DBoxes`): Ground truth boxes.
pred_bboxes (:obj:`BaseInstance3DBoxes`): Predicted boxes.
proj_mat (numpy.array, shape=[4, 4]): The projection matrix # 投影矩阵
according to the camera intrinsic parameters.
out_dir (str): Path of output directory.
filename (str): Filename of the current frame.
box_mode (str, optional): Coordinate system the boxes are in.
Should be one of 'depth', 'lidar' and 'camera'.
Defaults to 'lidar'.
img_metas (dict, optional): Used in projecting depth bbox.
Defaults to None.
show (bool, optional): Visualize the results online. Defaults to False.
颜色为B G R,不是RGB!!!
gt_bbox_color (str or tuple(int), optional): Color of bbox lines.
The tuple of color should be in BGR order. Default: (255, 102, 61).
pred_bbox_color (str or tuple(int), optional): Color of bbox lines.
The tuple of color should be in BGR order. Default: (72, 101, 241).
"""
# 根据传入3D框所处的坐标系调用对应的投影方法,获取投影框
if box_mode == 'depth':
draw_bbox = draw_depth_bbox3d_on_img
elif box_mode == 'lidar':
draw_bbox = draw_lidar_bbox3d_on_img
elif box_mode == 'camera':
draw_bbox = draw_camera_bbox3d_on_img
else:
raise NotImplementedError(f'unsupported box mode {box_mode}')
# 在out_dir下创建每个文件名字的文件夹
# result_path = osp.join(out_dir, filename)
# mmcv.mkdir_or_exist(result_path)
out_dir = out_dir + type + '/'
# 判断目录是否存在
if not os.path.exists(out_dir):
os.makedirs(out_dir)
else:
pass
# os.makedirs(out_dir)
# mmcv.mkdir_or_exist(result_path)
# if score_thr > 0:
# inds = pred_scores > score_thr
# pred_bboxes = pred_bboxes[inds]
# 获取投影矩阵
proj_mat = batch_data_samples[0].lidar2img
proj_mat = proj_mat[0]
proj_mat = np.array(proj_mat)
if show:
show_img = img.copy()
if gt_bboxes is not None:
show_img = draw_bbox(
gt_bboxes, show_img, proj_mat, img_metas, color=gt_bbox_color)
if pred_bboxes is not None:
show_img = draw_bbox(
pred_bboxes,
show_img,
proj_mat,
img_metas,
color=pred_bbox_color)
mmcv.imshow(show_img, win_name='project_bbox3d_img', wait_time=0)
if img is not None:
# print('写入原图像')
mmcv.imwrite(img, osp.join(out_dir, f'{filename}.png'))
if gt_bboxes is not None:
# 写入地面真相
gt_img = draw_bbox(
gt_bboxes, img, proj_mat, img_metas, color=gt_bbox_color)
mmcv.imwrite(gt_img, osp.join(out_dir, f'{filename}_gt.png'))
if pred_bboxes is not None:
pred_img = draw_bbox(
pred_bboxes, img, proj_mat, img_metas, color=pred_bbox_color)
mmcv.imwrite(pred_img, osp.join(out_dir, f'{filename}_pred.png'))
if pred_bboxes is not None and gt_bboxes is not None:
# print('draw_gt_bbox')
gt_img = draw_bbox(
gt_bboxes, img, proj_mat, img_metas, color=gt_bbox_color)
gt_and_pred_img = draw_bbox(
pred_bboxes, gt_img, proj_mat, img_metas, color=pred_bbox_color)
mmcv.imwrite(gt_and_pred_img, osp.join(out_dir, f'{filename}_pred_gt.png'))
# draw_utils.py
# Copyright (c) OpenMMLab. All rights reserved.
import copy
import cv2
import numpy as np
import torch
from matplotlib import pyplot as plt
def project_pts_on_img(points,
raw_img,
lidar2img_rt,
max_distance=70,
thickness=-1):
"""Project the 3D points cloud on 2D image.
Args:
points (numpy.array): 3D points cloud (x, y, z) to visualize.
raw_img (numpy.array): The numpy array of image.
lidar2img_rt (numpy.array, shape=[4, 4]): The projection matrix
according to the camera intrinsic parameters.
max_distance (float, optional): the max distance of the points cloud.
Default: 70.
thickness (int, optional): The thickness of 2D points. Default: -1.
"""
img = raw_img.copy()
num_points = points.shape[0]
pts_4d = np.concatenate([points[:, :3], np.ones((num_points, 1))], axis=-1)
pts_2d = pts_4d @ lidar2img_rt.T
# cam_points is Tensor of Nx4 whose last column is 1
# transform camera coordinate to image coordinate
pts_2d[:, 2] = np.clip(pts_2d[:, 2], a_min=1e-5, a_max=99999)
pts_2d[:, 0] /= pts_2d[:, 2]
pts_2d[:, 1] /= pts_2d[:, 2]
fov_inds = ((pts_2d[:, 0] < img.shape[1])
& (pts_2d[:, 0] >= 0)
& (pts_2d[:, 1] < img.shape[0])
& (pts_2d[:, 1] >= 0))
imgfov_pts_2d = pts_2d[fov_inds, :3] # u, v, d
cmap = plt.cm.get_cmap('hsv', 256)
cmap = np.array([cmap(i) for i in range(256)])[:, :3] * 255
for i in range(imgfov_pts_2d.shape[0]):
depth = imgfov_pts_2d[i, 2]
color = cmap[np.clip(int(max_distance * 10 / depth), 0, 255), :]
cv2.circle(
img,
center=(int(np.round(imgfov_pts_2d[i, 0])),
int(np.round(imgfov_pts_2d[i, 1]))),
radius=1,
color=tuple(color),
thickness=thickness,
)
cv2.imshow('project_pts_img', img.astype(np.uint8))
cv2.waitKey(0)
def plot_rect3d_on_img(img,
num_rects,
rect_corners,
color=(0, 255, 0),
thickness=1):
"""Plot the boundary lines of 3D rectangular on 2D images.
Args:
img (numpy.array): The numpy array of image.
num_rects (int): Number of 3D rectangulars.
rect_corners (numpy.array): Coordinates of the corners of 3D
rectangulars. Should be in the shape of [num_rect, 8, 2].
color (tuple[int], optional): The color to draw bboxes.
Default: (0, 255, 0).
thickness (int, optional): The thickness of bboxes. Default: 1.
"""
line_indices = ((0, 1), (0, 3), (0, 4), (1, 2), (1, 5), (3, 2), (3, 7),
(4, 5), (4, 7), (2, 6), (5, 6), (6, 7))
# thickness = 0.5
# print('rect_corners type:', rect_corners.dtype)
# print('img type',type(img))
for i in range(num_rects):
corners = rect_corners[i].astype(np.int64)
# print("opencv corners type:", corners.dtype)
for start, end in line_indices:
# cv2.line(img, (corners[start, 0], corners[start, 1]),
# (corners[end, 0], corners[end, 1]), color, thickness,
# cv2.LINE_AA)
# print("change:", type(int(corners[start, 0])))
cv2.line(img,
tuple(corners[start]),
tuple(corners[end]),
color,
thickness,
cv2.LINE_AA)
# cv2.line(img,
# (int(corners[start, 0]), int(corners[start, 1])),
# (int(corners[end, 0]), int(corners[end, 1])),
# color,
# thickness,
# cv2.LINE_AA)
# return img.astype(np.uint8)
return img
def draw_lidar_bbox3d_on_img(bboxes3d,
raw_img,
lidar2img_rt,
img_metas,
color=(0, 255, 0),
thickness=1):
"""Project the 3D bbox on 2D plane and draw on input image.
Args:
bboxes3d (:obj:`LiDARInstance3DBoxes`):
3d bbox in lidar coordinate system to visualize.
raw_img (numpy.array): The numpy array of image.
lidar2img_rt (numpy.array, shape=[4, 4]): The projection matrix
according to the camera intrinsic parameters.
img_metas (dict): Useless here.
color (tuple[int], optional): The color to draw bboxes.
Default: (0, 255, 0).
thickness (int, optional): The thickness of bboxes. Default: 1.
"""
img = raw_img.copy()
corners_3d = bboxes3d.corners.cpu().numpy()
num_bbox = corners_3d.shape[0]
pts_4d = np.concatenate(
[corners_3d.reshape(-1, 3),
np.ones((num_bbox * 8, 1))], axis=-1)
lidar2img_rt = copy.deepcopy(lidar2img_rt).reshape(4, 4)
if isinstance(lidar2img_rt, torch.Tensor):
lidar2img_rt = lidar2img_rt.cpu().numpy()
pts_2d = pts_4d @ lidar2img_rt.T
pts_2d[:, 2] = np.clip(pts_2d[:, 2], a_min=1e-5, a_max=1e5)
pts_2d[:, 0] /= pts_2d[:, 2]
pts_2d[:, 1] /= pts_2d[:, 2]
imgfov_pts_2d = pts_2d[..., :2].reshape(num_bbox, 8, 2)
return plot_rect3d_on_img(img, num_bbox, imgfov_pts_2d, color, thickness)
# TODO: remove third parameter in all functions here in favour of img_metas
def draw_depth_bbox3d_on_img(bboxes3d,
raw_img,
calibs,
img_metas,
color=(0, 255, 0),
thickness=1):
"""Project the 3D bbox on 2D plane and draw on input image.
Args:
bboxes3d (:obj:`DepthInstance3DBoxes`, shape=[M, 7]):
3d bbox in depth coordinate system to visualize.
raw_img (numpy.array): The numpy array of image.
calibs (dict): Camera calibration information, Rt and K.
img_metas (dict): Used in coordinates transformation.
color (tuple[int], optional): The color to draw bboxes.
Default: (0, 255, 0).
thickness (int, optional): The thickness of bboxes. Default: 1.
"""
from mmdet3d.structures import points_cam2img
from mmdet3d.models import apply_3d_transformation
img = raw_img.copy()
img_metas = copy.deepcopy(img_metas)
corners_3d = bboxes3d.corners
num_bbox = corners_3d.shape[0]
points_3d = corners_3d.reshape(-1, 3)
# first reverse the data transformations
xyz_depth = apply_3d_transformation(
points_3d, 'DEPTH', img_metas, reverse=True)
# project to 2d to get image coords (uv)
uv_origin = points_cam2img(xyz_depth,
xyz_depth.new_tensor(img_metas['depth2img']))
uv_origin = (uv_origin - 1).round()
imgfov_pts_2d = uv_origin[..., :2].reshape(num_bbox, 8, 2).numpy()
return plot_rect3d_on_img(img, num_bbox, imgfov_pts_2d, color, thickness)
def draw_camera_bbox3d_on_img(bboxes3d,
raw_img,
cam2img,
img_metas,
color=(0, 255, 0),
thickness=1):
"""Project the 3D bbox on 2D plane and draw on input image.
Args:
bboxes3d (:obj:`CameraInstance3DBoxes`, shape=[M, 7]):
3d bbox in camera coordinate system to visualize.
raw_img (numpy.array): The numpy array of image.
cam2img (dict): Camera intrinsic matrix,
denoted as `K` in depth bbox coordinate system.
img_metas (dict): Useless here.
color (tuple[int], optional): The color to draw bboxes.
Default: (0, 255, 0).
thickness (int, optional): The thickness of bboxes. Default: 1.
"""
from mmdet3d.structures import points_cam2img
img = raw_img.copy()
cam2img = copy.deepcopy(cam2img)
corners_3d = bboxes3d.corners
num_bbox = corners_3d.shape[0]
points_3d = corners_3d.reshape(-1, 3)
if not isinstance(cam2img, torch.Tensor):
cam2img = torch.from_numpy(np.array(cam2img))
assert (cam2img.shape == torch.Size([3, 3])
or cam2img.shape == torch.Size([4, 4]))
cam2img = cam2img.float().cpu()
# project to 2d to get image coords (uv)
uv_origin = points_cam2img(points_3d, cam2img)
uv_origin = (uv_origin - 1).round()
imgfov_pts_2d = uv_origin[..., :2].reshape(num_bbox, 8, 2).numpy()
return plot_rect3d_on_img(img, num_bbox, imgfov_pts_2d, color, thickness)
下面是推理和绘制的完整代码,必要的注释已经给出。
from custom_API.draw_box import show_multi_modality_result #如何导入取决于读者如何存放
print(f'datasets length:{len(datasets)}')
data_root = 'data/kitti/' # 数据集根路径
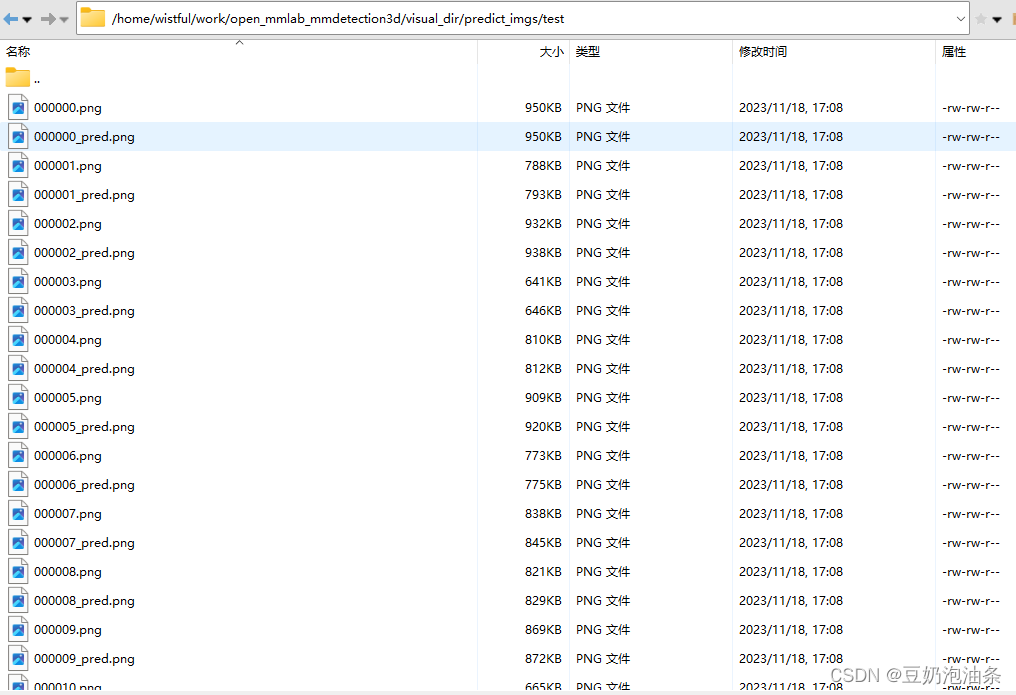
save_root = '/home/wistful/work/open_mmlab_mmdetection3d/visual_dir/predict_imgs/' # 保存可视化结果的根路径
data_num = 100 # 最大不能超过数据集长度
# 判断一开始是读取的哪个数据集
if set == 'train' or set == 'val':
new_set = 'training'
else:
new_set = 'testing'
# 推理整个数据集的前data_num条数据
for i in tqdm(range(data_num), desc='process situation'):
# cyclic_load_data_item代码位于第2步
batch_inputs_dict, batch_data_samples = cyclic_load_data_item(datasets, index=i, device=device) # 读取一条数据,并构建批次
points = batch_inputs_dict['points'][0] # 获取点云,因为是单条数据,所以直接取0
# 获取检测结果
result, data = inference_detector(model, points.cpu())
bboxes_3d = result.pred_instances_3d.bboxes_3d
labels_3d = result.pred_instances_3d.labels_3d
scores_3d = result.pred_instances_3d.scores_3d
# 设置阈值
thr = 0.4
score = (scores_3d > thr)
bboxes_3d = bboxes_3d[score] # 根据阈值筛选
# 读取原始图像
img_file_path = data_root + new_set + '/image_2/' + batch_data_samples[0].img_path[0]
image = cv2.imread(img_file_path)
img_name = batch_data_samples[0].img_path[0].split('.')[0] # 取一下文件名
# 保存多模态结果(调用的旧版mmdet代码接口)
show_multi_modality_result(img=image,
box_mode='lidar',
gt_bboxes=None,
pred_bboxes=bboxes_3d,
batch_data_samples=batch_data_samples,
out_dir=save_root,
filename=img_name,
type=set,
show=False)
# result = model(batch_inputs_dict, batch_data_samples) # model的输入与具体模型有关
运行上述代码后,会在设置的save_root下生成可视化图片